
Virtual Science Ltd
+44 1249 736656
Resistivity of Constantan
Introduction
Every material that obeys Ohm’s law (not all materials do) has a characteristic resistivity. The resistivity is a constant for a particular substance that allows you to calculate what the resistance is in ohms for a wire of a particular length with a particular cross-sectional area. This is given by:
R = ρL/A
Where ρ is the resistivity, L is the length, and A is the cross-sectional area.
This experiment allows you to plot the resistance against the length of wire that the current is flowing through. Given that you can find the cross-sectional area by measuring the diameter with a micrometer, you can then calculate the resistivity.
The objective
To find the resistivity of constantan.
The apparatus
• A DC power supply
• A length of constantan wire
• Two multimeters
• A micrometer
• A meter ruler
• Two crocodile clips
• Some ordinary electrical wire
• Two mounting blocks to support the wire
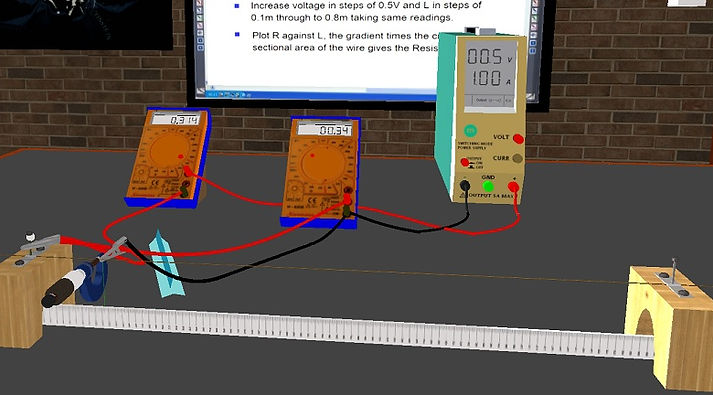
The Circuit
A power source is connected in series with the constantan wire and the ammeter. A voltmeter is connected across the wire. A crocodile clip is used so that the length of the wire that forms part of the completed circuit can be varied.

The variables
The length of the wire in the closed circuit is the independent variable. The voltage and the current are the dependent variables.
The Physics
As given in the introduction to this chapter, the resistance of a length of wire is given by:
R = ρL/A
Where ρ is the resistivity, L is the length, and A is the cross-sectional area. This can be rearranged to give an equation for the resistivity:
ρ = RA/L
Given that we can calculate A from the diameter of the wire, plotting R against L will give us a gradient that we can use to calculate the resistivity.
The method
Use the micrometer to measure the diameter of the constantan wire. Make a note of this in your laboratory book.
Switch on the power supply. With the power on, you now need to vary the voltage to 0.5V. Move the crocodile to the 10-cm point.
At this point, take readings of the voltage and current. Now move the crocodile clip to the 20-cm position and increase the voltage by 0.5V (this is to keep the current roughly the same for each reading). Take readings for voltage and current. Repeat this for lengths of constantan up to 80 cm.
The Video
Watch a video of the Resistivity of Constantan e-practical here.
This shows how to use it and how to collect the data.
The E-Practical
Perform the experiment yourself, collect your own data, make mistakes and be able to correct them. The e-practical requires that your browser can run WebGL 2 (usually found on Windows browsers, safari on iOS, and various Mobile browsers, test with https://get.webgl.org/webgl2/). This link is for students and evaluation only, schools should purchase a site licence.
All the e-practicals will run on devices as small as a mobile 'phone. However, the best experience is on a PC using a mouse which gives very precise control, but if you are limited to a small device, consider using a stylus or a blue tooth mouse.
You can switch on the power supply by clicking on the red on/off button. You should see the Output indicator on the power supply screen indicate a connection, as shown here:

If you hover the mouse over the red knob marked ‘VOLT’, you will see it change to yellow. Using the mouse wheel, you can raise or lower the voltage output by the power supply unit (or drag if using the onscreen controls).
You can move the position of the crocodile clip that is attached to the wire by placing the cursor over the clip and using the mouse wheel (or drag if using the onscreen controls).
At the start of the experiment, you will need to move the crocodile to the 10-cm point, so you will first need to move the micrometer out of the way. With the mouse over the jaws of the micrometer, rotate the mouse wheel (or drag if using the onscreen controls) so that the micrometer moves to the left; move it as far as you can. Now, using the same method, move the crocodile clip to the 10-cm point. Notice that there is an indicator which shows its position on the ruler underneath, as shown here:

You will need to measure the diameter of the wire using the micrometer. To do this, move the crocodile clip as far to the right as you can so that it is well out of the way. Then position yourself at the left-hand edge of the table. Use the zoom function (plus and minus or Z/X keys, or the magnify icon) to zoom in on the micrometer.
You can rotate the barrel using the mouse wheel when the cursor is over the end part of the barrel. The rachet will sound when the micrometer is tight. Tighten the micrometer onto the wire by rotating the barrel, and then take the reading of the diameter. You cannot move the micrometer when it is tightly gripping the wire.
Do this in two other places along the wire and take the average.
The Results
Complete this table with your readings:

You can calculate the Ohms column using Ohm’s Law. A trick for remembering Ohm’s law is to think of the name Eric. Ic is often used to denote current and E for Electromotive force, and r for resistance. So the formula can be remembered as:
E = R Ic
When you have completed the table plot a graph of R against L and determine the best-fit line through your data points.
Where R/L is the gradient of your graph. The resistivity is calculated from this gradient multiplied by the cross-sectional area.
Further Discussion
Why do we try to keep the current the same for each reading that we take?
This section is adapted from material developed by Dr Robert Lucas and is related to the book High School and Undergraduate Physics Practicals, published by CRC Press.